
Introduction
There’s something undeniably magical about chocolate mousse. Its rich, creamy texture, paired with the intense, luxurious flavor of chocolate, makes it one of the most indulgent desserts around. But if you’ve ever been intimidated by the idea of making mousse, you’re not alone. Traditional mousse recipes can sometimes be a bit complicated, requiring multiple steps, ingredients, and techniques. But what if we told you that you can achieve the same decadent result with just two simple ingredients?
Two-Ingredient Chocolate Mousse is here to change the game. Imagine a mousse so velvety and delicious that it tastes like it came from an upscale restaurant or an elegant dinner party, but without the fuss. This recipe is a total game-changer—quick, easy, and ridiculously simple. All you need is high-quality chocolate and heavy cream. That’s it! No eggs, no sugar, no complicated steps—just a little bit of whisking, and the magic happens.
Whether you’re a seasoned baker or a complete beginner in the kitchen, this mousse is a foolproof way to indulge in a rich, creamy dessert without any of the stress. It’s the perfect treat for chocolate lovers, especially when you want something that feels decadent but doesn’t take much time to prepare. In just under 15 minutes of prep (not including chill time), you’ll have a mousse so smooth and luxurious, you’ll wonder how something so simple could taste so amazing.
This mousse is also highly versatile. Want to switch it up? You can use dark, milk, or white chocolate to create different flavor profiles. Add a splash of vanilla, a pinch of sea salt, or even a dash of your favorite liqueur to elevate it even more. And with no baking required, it’s the ideal dessert for warm weather, busy weeknights, or last-minute gatherings when you want to impress without any hassle.
In this article, we’ll walk you through the easy steps to make this Two-Ingredient Chocolate Mousse, share helpful tips for achieving the perfect texture, and suggest creative ways to serve and garnish your mousse for a little extra flair. Whether you’re looking to whip up a quick dessert for yourself or impress guests at a dinner party, this mousse is guaranteed to deliver a rich, satisfying chocolate experience with minimal effort. So, grab your ingredients and let’s get started on creating this show-stopping, no-fuss dessert!

Why You’ll Love This Two-Ingredient Chocolate Mousse
- Minimal Ingredients: Only two ingredients—chocolate and cream—make this mousse a breeze to prepare.
- Quick and Easy: With just a bit of whisking, you can have a rich, creamy mousse in under 15 minutes (not including chilling time).
- Decadent Texture: The mousse is luxuriously smooth and creamy, with a texture that melts in your mouth.
- Versatile: You can customize this mousse by adding toppings, flavorings, or using it as a base for other desserts.
- No Special Equipment: You don’t need a fancy mixer or a bain-marie—just a whisk, a bowl, and your ingredients.
Preparation Time and Servings
- Total Time: 15 minutes (10 minutes for prep, 5 minutes for chilling)
- Servings: This recipe makes about 4 servings (depending on the size of your cups).
- Nutrition Facts (per serving):
Calories: 300
Protein: 3g
Carbs: 20g
Fat: 23g
Ingredients
- 8 oz (about 1 cup) high-quality dark or semisweet chocolate: Choose a good quality chocolate with at least 60% cocoa for the best flavor and texture.
- 1 cup heavy whipping cream: This is what gives the mousse its smooth, rich, and airy texture.
Step-by-Step Instructions
First Step: Melt the Chocolate
- Chop the Chocolate: Use a sharp knife to chop the chocolate into small, even pieces. This will help the chocolate melt evenly and smoothly.
- Melt the Chocolate: Place the chopped chocolate in a heatproof bowl. You can melt it using one of two methods:
- Double Boiler Method: Set the bowl over a pot of simmering water, making sure the bottom of the bowl doesn’t touch the water. Stir occasionally until the chocolate is fully melted and smooth.
- Microwave Method: Heat the chocolate in the microwave in 20-second intervals, stirring in between until fully melted and smooth. Be careful not to burn the chocolate.
- Cool the Chocolate: Once the chocolate is melted, allow it to cool for a few minutes at room temperature. It should be slightly warm but not hot.
Second Step: Whip the Cream
- Chill the Bowl and Whisk: For best results, chill your mixing bowl and whisk (or electric beaters) in the fridge for 10 minutes before whipping the cream. This will help the cream whip up more easily and hold its shape.
- Whip the Cream: Pour the heavy cream into the chilled bowl and begin whipping with a hand whisk or an electric mixer. Start on low speed and gradually increase to medium-high until soft peaks form. The cream should hold its shape but still be slightly soft and smooth.
Third Step: Fold the Chocolate into the Whipped Cream
- Add the Melted Chocolate: Once the cream has been whipped to soft peaks, add the slightly cooled melted chocolate into the bowl. Make sure the chocolate isn’t too hot, as this could cause the cream to deflate.
- Fold the Chocolate: Using a spatula, gently fold the chocolate into the whipped cream. Be careful not to overmix—just fold until the chocolate is fully incorporated, and the mousse is smooth and creamy.
Fourth Step: Chill the Mousse
- Transfer to Cups: Spoon the mousse into individual serving cups or bowls. You can also pipe the mousse into cups for a more elegant presentation.
- Chill: Refrigerate the mousse for at least 2 hours, or preferably overnight. The mousse will set as it chills, becoming even creamier and firmer.
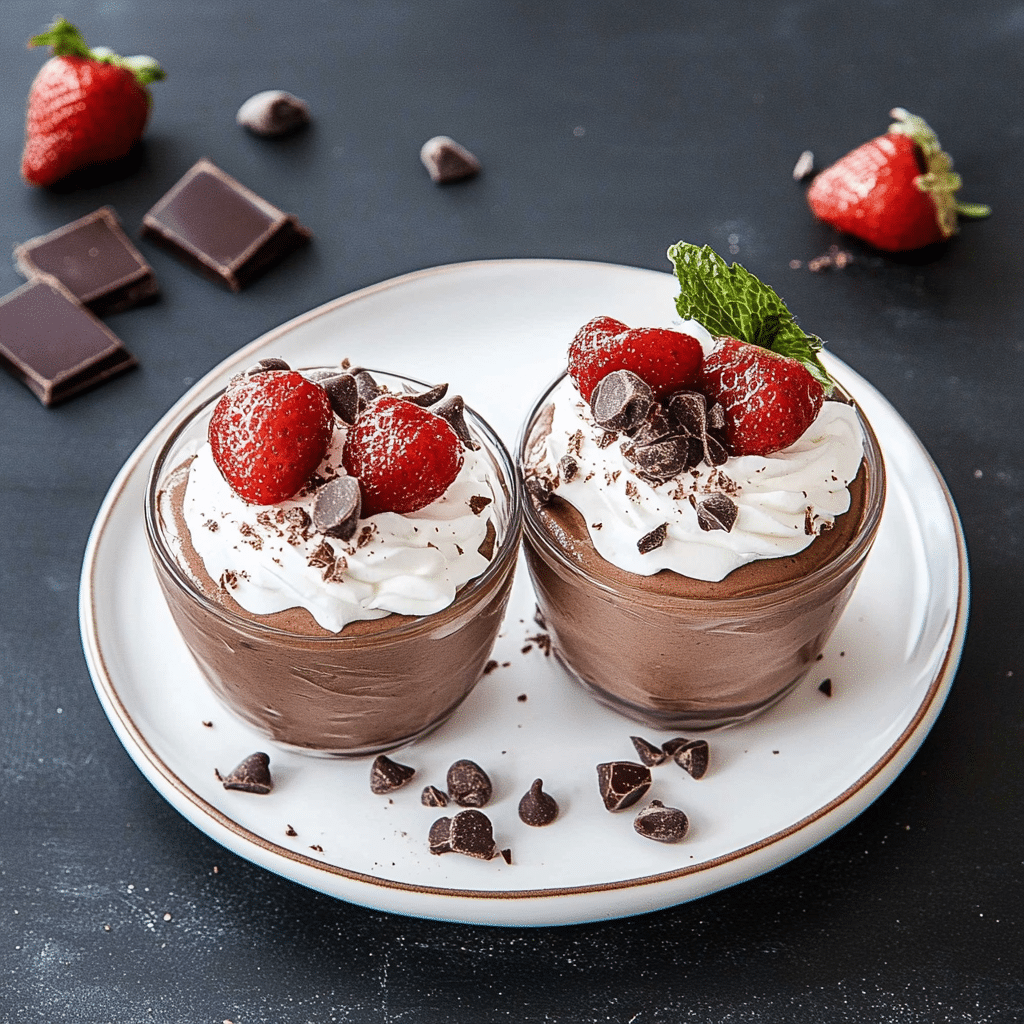
Fifth Step: Serve and Enjoy the Chocolate Mousse
- Garnish (Optional): Before serving, feel free to top the mousse with your favorite garnishes. A few ideas include:
- Whipped cream
- Shaved chocolate or chocolate curls
- Fresh berries
- Crushed nuts (like hazelnuts or pistachios)
- A drizzle of caramel or chocolate sauce
- Serve: Once the mousse is chilled and set, serve immediately. Enjoy this rich, creamy dessert on its own or as part of a larger dessert spread.
How to Serve Two-Ingredient Chocolate Mousse
This Two-Ingredient Chocolate Mousse is perfect for a variety of occasions. Here are some ideas for how to serve it:
1. As a Simple Dessert
Serve this mousse as a stand-alone dessert for dinner parties, special occasions, or even a cozy night in. Its rich, silky texture is sure to impress.
2. With Fruit for Chocolate Mousse
Pair the mousse with fresh berries like raspberries, strawberries, or blueberries. The tartness of the fruit contrasts beautifully with the sweetness and richness of the mousse.
3. As a Parfait Layer
Layer the mousse in glasses with crushed cookies, granola, or whipped cream to make a quick and easy parfait. Add a few chocolate shavings or a drizzle of caramel for extra decadence.
4. As a Cake Filling
Use the mousse as a filling between layers of cake or as a frosting for cupcakes. It’s the perfect addition to chocolate or vanilla cakes.
Recipe Variations for Chocolate Mousse
While this Two-Ingredient Chocolate Mousse is simple and delicious on its own, there are many ways to customize it to suit your taste:
1. Use Milk Chocolate
If you prefer a sweeter, creamier flavor, you can substitute milk chocolate for dark chocolate. This will create a smoother, lighter mousse.
2. Add Flavor Extracts to Chocolate Mousse
For a unique twist, add a few drops of vanilla extract, almond extract, or orange zest to the mousse. These flavors will enhance the chocolate and add a subtle depth of flavor.
3. Vegan Option for Chocolate MOUSSE
For a vegan version, swap the heavy cream for coconut cream (chill a can of full-fat coconut milk overnight and use only the solid cream). You can also use dairy-free chocolate for the base.
Tips for Perfect Two-Ingredient Chocolate Mousse
- Use High-Quality Chocolate: Since the chocolate is the main ingredient, use the best quality chocolate you can find. Dark chocolate with at least 60% cocoa will give the mousse a rich, deep flavor.
- Don’t Overwhip the Cream: Be sure to stop whipping the cream when soft peaks form. If you whip it too long, it may turn into butter, affecting the texture of the mousse.
- Cool the Chocolate: Always let the melted chocolate cool slightly before adding it to the whipped cream to avoid deflating the mousse.
- Chill the Mousse Long Enough: Allow the mousse to chill for at least 2 hours to achieve the perfect texture. The longer it chills, the firmer it will get.
Conclusion
Two-Ingredient Chocolate Mousse is the perfect example of how simplicity can create an indulgent, sophisticated dessert. With just two basic ingredients—high-quality chocolate and heavy cream—you can create a creamy, smooth mousse that feels like a luxurious treat, yet requires very little effort to make. The beauty of this recipe lies in its versatility and ease: whether you’re in the mood for a quick and satisfying dessert after dinner, planning a dinner party, or simply treating yourself to a sweet snack, this mousse has you covered.
One of the best things about this mousse is its adaptability. You can easily customize the flavor by using different types of chocolate (milk, dark, or even white chocolate), adding flavorings like vanilla extract, orange zest, or a splash of liqueur. You can top it with fresh berries, whipped cream, or a sprinkle of cocoa powder for an elegant presentation, or keep it simple for a more laid-back treat. Whether you serve it in individual cups, in parfait layers, or even as a cake filling, it’s sure to impress anyone who tastes it.
What’s even more remarkable is how the mousse comes together in just minutes, with only a bit of whisking to achieve that silky, velvety texture. There’s no baking required, making it the ideal dessert when you want something delicious without spending hours in the kitchen. Plus, it’s a great dessert for any occasion—be it a casual weeknight, a special celebration, or even as a sweet finish to a holiday meal.
So the next time you’re looking for a dessert that feels fancy but doesn’t require a lot of time or ingredients, look no further than this Two-Ingredient Chocolate Mousse. It’s proof that sometimes, the simplest recipes are the best—and in this case, the results are nothing short of heavenly.