

Introduction
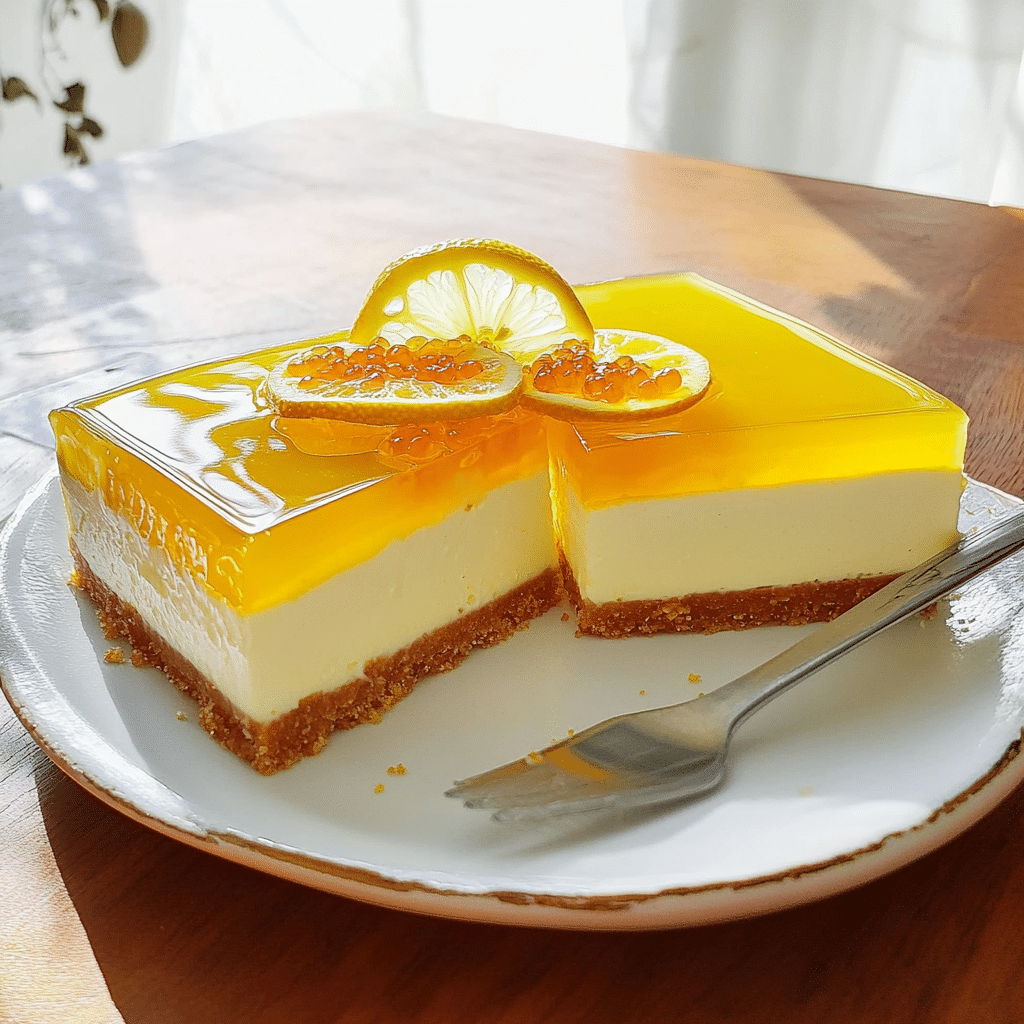
If you’re a fan of light, refreshing, and indulgent desserts, then a No-Bake Lemon Jelly Cheesecake should be at the top of your list. This no-bake cheesecake is a delightful twist on the classic cheesecake, featuring a bright, citrusy lemon flavor paired with a silky smooth cream cheese filling, all topped with a glossy, fruity jelly layer. The best part? You don’t need to turn on the oven!
Perfect for a hot summer day, a special occasion, or just whenever you want something easy yet impressive, this No-Bake Lemon Jelly Cheesecake is a crowd-pleaser. It’s quick to prepare, looks stunning, and, most importantly, tastes absolutely divine. Whether you’re an experienced baker or a beginner, this cheesecake will be a showstopper that requires minimal effort and delivers maximum flavor.
In this article, we’ll walk you through everything you need to know to make a mouthwatering No-Bake Lemon Jelly Cheesecake. From the ingredients to the step-by-step instructions, plus some handy tips and tricks for perfecting the recipe, you’ll be ready to make this dessert in no time. Let’s dive in!
Perfect for:
- Special celebrations like birthdays, anniversaries, or holidays.
- Hot summer days when you don’t want to bake.
- A refreshing dessert after a heavy meal.
- Those with a sweet tooth who crave something tangy and creamy.
- Impressing your friends and family with minimal effort.
Why You’ll Love This No-Bake Lemon Jelly Cheesecake
This No-Bake Lemon Jelly Cheesecake isn’t just another ordinary dessert. Here’s why you’ll fall in love with it:
- Light and Refreshing: The combination of the tangy lemon flavor with the rich cream cheese filling makes this cheesecake incredibly refreshing, especially in the warmer months.
- No-Bake: The beauty of this recipe is that there’s no need to bake anything, so it’s perfect for those hot days when you want a dessert but don’t want to turn on the oven.
- Easy to Make: With a straightforward process and no complicated steps, this recipe is beginner-friendly. You only need to mix, chill, and enjoy.
- Impressive Appearance: The glossy lemon jelly topping adds an elegant finish to this dessert, making it a great choice for special occasions.
- Customizable: While lemon is the star of the show, you can easily adapt the flavor with other fruits, such as berries, lime, or orange, to create variations.
Preparation and Cooking Time of No-Bake Lemon Jelly Cheesecake
- Total Time: 4 hours (includes chilling time)
- Preparation Time: 20 minutes
- Chill Time: 3-4 hours (or overnight)
- Servings: 8-10 servings
- Calories per Serving: Approximately 250-300 calories
- Key Nutrients: Protein: 4g, Carbs: 30g, Fat: 15g
Ingredients of No-Bake Lemon Jelly Cheesecake
For a delicious No-Bake Lemon Jelly Cheesecake, you’ll need simple ingredients that come together beautifully. Here’s what you need to make this dessert:
For the Crust:
- 1 1/2 cups digestive biscuits or graham crackers, crushed
- 1/4 cup melted butter
- 2 tablespoons sugar (optional, depending on your sweetness preference)
For Cheesecake Filling:
- 2 cups cream cheese, softened
- 1 cup heavy cream (whipping cream)
- 1/2 cup powdered sugar (icing sugar)
- 1/4 cup lemon juice (freshly squeezed)
- Zest of 1 lemon
- 1 teaspoon vanilla extract
- 1 tablespoon gelatin powder (or agar-agar for a vegetarian version)
The Lemon Jelly Topping:
- 1 packet (3 oz) lemon-flavored gelatin (or use lemon juice and sugar for a more natural option)
- 1/2 cup water
- 2 tablespoons sugar (optional, depending on your sweetness preference)
Garnishes (Optional):
- Fresh mint leaves
- Lemon slices or wedges
- Whipped cream
- Grated lemon zest
Ingredient Highlights
- Digestive Biscuits or Graham Crackers: These form the base of the cheesecake. They add a buttery, slightly sweet crunch that complements the creamy filling.
- Cream Cheese: The star of the filling, cream cheese lends richness and tanginess to the dessert, creating the perfect balance of flavors.
- Heavy Cream: Whipped heavy cream is folded into the filling to give the cheesecake a light and airy texture.
- Gelatin: The gelatin sets the filling, ensuring that the cheesecake holds its shape once it’s chilled.
- Lemon: Fresh lemon juice and zest bring a refreshing tang to the dessert. The citrusy flavor pairs perfectly with the rich cream cheese filling.
- Lemon Jelly: The jelly topping adds a glossy, sweet finish to the cheesecake, intensifying the lemon flavor.
Step-by-Step Instructions
Let’s break down how to make this delightful No-Bake Lemon Jelly Cheesecake. The process is simple and involves just a few easy steps.
First Step: Prepare the Crust
- Crush the Biscuits: Start by crushing the digestive biscuits or graham crackers. You can use a food processor for a fine texture, or place the biscuits in a ziplock bag and crush them with a rolling pin until you get fine crumbs.
- Mix the Crust: In a mixing bowl, combine the crushed biscuits with the melted butter and sugar. Stir until the mixture is evenly combined and resembles wet sand.
- Press the Crust: Transfer the biscuit mixture to a 9-inch (23 cm) springform pan or pie dish. Press the crumbs down with the back of a spoon to create an even layer at the bottom. Be sure to press it firmly so it holds together when the cheesecake is set.
- Chill the Crust: Place the crust in the fridge to chill while you prepare the cheesecake filling. This will allow the crust to firm up and set.
Second Step: Prepare the Cheesecake Filling
- Bloom the Gelatin: In a small bowl, sprinkle the gelatin powder over 2 tablespoons of cold water. Let it sit for about 5 minutes to bloom. The gelatin will absorb the water and swell up, preparing it for the next step.
- Dissolve the Gelatin: After the gelatin has bloomed, gently heat it in the microwave for 10-15 seconds or on the stovetop until it becomes liquid. Stir to ensure there are no lumps. Let it cool slightly.
- Whip the Cream: In a separate large bowl, whip the heavy cream with a hand mixer or stand mixer until stiff peaks form. Set aside.
- Mix the Cream Cheese: In another bowl, beat the softened cream cheese with a hand mixer until smooth and creamy. Add the powdered sugar, vanilla extract, lemon juice, and lemon zest. Continue to beat until well combined.
- Combine the Gelatin and Cream Cheese: Slowly add the dissolved gelatin into the cream cheese mixture, mixing until incorporated. Make sure the gelatin isn’t too hot when you add it, as it could cause the mixture to curdle.
- Fold in the Whipped Cream: Gently fold the whipped cream into the cream cheese mixture. Use a spatula to mix, being careful not to deflate the whipped cream. This will keep the filling light and airy.
Third Step: Assemble the Cheesecake
- Fill the Pan: Pour the cream cheese filling over the chilled crust, smoothing it out with a spatula. Make sure the filling is evenly distributed and there are no air bubbles.
- Chill the Cheesecake: Cover the cheesecake with plastic wrap or foil and refrigerate for at least 3-4 hours, or preferably overnight. This will allow the cheesecake to set properly.
Fourth Step: Prepare the Lemon Jelly Topping
- Prepare the Jelly: In a small saucepan, heat the water and sugar (if using) over low heat until the sugar dissolves. Once the sugar has dissolved, stir in the lemon-flavored gelatin. Bring the mixture to a boil, then remove it from the heat and let it cool to room temperature.
- Top the Cheesecake: Once the cheesecake filling has set, carefully pour the cooled lemon jelly over the top. Ensure that the jelly layer is evenly spread across the surface.
- Chill Again: Return the cheesecake to the refrigerator and chill for another 1-2 hours, or until the jelly has fully set and the cheesecake is firm.
Fifth Step: Garnish and Serve
- Garnish the Cheesecake: Once the cheesecake has set, remove it from the fridge and carefully run a knife around the edge of the springform pan to release the sides. Top the cheesecake with fresh mint leaves, lemon slices, or a dollop of whipped cream for an extra touch of elegance.
- Slice and Enjoy: Cut the cheesecake into slices and serve chilled. The cheesecake should have a creamy filling with a smooth, glossy jelly topping.
How to Serve No-Bake Lemon Jelly Cheesecake
This No-Bake Lemon Jelly Cheesecake is stunning on its own, but here are some ways to elevate the presentation and serve it:
- With Fresh Berries: Top the cheesecake with a handful of fresh berries, like raspberries, blueberries, or strawberries. Their natural sweetness complements the tangy lemon flavor.
- As Individual Portions: For a more sophisticated presentation, consider serving this cheesecake in individual portions using small dessert glasses or ramekins.
- With a Side of Lemon Sorbet: Serve each slice of cheesecake with a scoop of lemon sorbet for a refreshing dessert combo.
Tips for Perfecting Your No-Bake Lemon Jelly Cheesecake
- Room Temperature Ingredients: Make sure your cream cheese is softened to room temperature before mixing it. Cold cream cheese can result in lumps in the filling.
- Gelatin Tips: Be careful not to let the gelatin mixture become too hot before adding it to the cream cheese filling. Otherwise, it could cause the filling to separate or become grainy.
- Chill Time is Key: Be sure to allow enough time for the cheesecake to chill and set properly. This will ensure the texture is perfect and that the cheesecake holds its shape when served.
- Make It Ahead: This cheesecake is ideal for making in advance. In fact, it tastes even better when it has had time to chill overnight.
Variations for No-Bake Lemon Jelly Cheesecake
While lemon is the star of this recipe, you can easily switch things up:
- Berry Jelly Cheesecake: Use raspberry, strawberry, or blueberry-flavored jelly instead of lemon for a fruity twist.
- Lime Jelly Cheesecake: For a tropical flair, substitute the lemon for lime in both the filling and jelly topping.
- Mixed Fruit: Top the cheesecake with a medley of fresh fruits like mango, kiwi, or passion fruit for a colorful and vibrant dessert.
No-Bake Lemon Jelly Cheesecake
- Total Time: 4 hours (includes chilling time)
Ingredients
For the Crust:
- 1 1/2 cups digestive biscuits or graham crackers, crushed
- 1/4 cup melted butter
- 2 tablespoons sugar (optional, depending on your sweetness preference)
For the Cheesecake Filling:
- 2 cups cream cheese, softened
- 1 cup heavy cream (whipping cream)
- 1/2 cup powdered sugar (icing sugar)
- 1/4 cup lemon juice (freshly squeezed)
- Zest of 1 lemon
- 1 teaspoon vanilla extract
- 1 tablespoon gelatin powder (or agar-agar for a vegetarian version)
For the Lemon Jelly Topping:
- 1 packet (3 oz) lemon-flavored gelatin (or use lemon juice and sugar for a more natural option)
- 1/2 cup water
- 2 tablespoons sugar (optional, depending on your sweetness preference)
Garnishes (Optional):
- Fresh mint leaves
- Lemon slices or wedges
- Whipped cream
- Grated lemon zest
Ingredient Highlights
- Digestive Biscuits or Graham Crackers: These form the base of the cheesecake. They add a buttery, slightly sweet crunch that complements the creamy filling.
- Cream Cheese: The star of the filling, cream cheese lends richness and tanginess to the dessert, creating the perfect balance of flavors.
- Heavy Cream: Whipped heavy cream is folded into the filling to give the cheesecake a light and airy texture.
- Gelatin: The gelatin sets the filling, ensuring that the cheesecake holds its shape once it’s chilled.
- Lemon: Fresh lemon juice and zest bring a refreshing tang to the dessert. The citrusy flavor pairs perfectly with the rich cream cheese filling.
- Lemon Jelly: The jelly topping adds a glossy, sweet finish to the cheesecake, intensifying the lemon flavor.
Instructions
Step 1: Prepare the Crust
-
Crush the Biscuits: Start by crushing the digestive biscuits or graham crackers. You can use a food processor for a fine texture, or place the biscuits in a ziplock bag and crush them with a rolling pin until you get fine crumbs.
-
Mix the Crust: In a mixing bowl, combine the crushed biscuits with the melted butter and sugar. Stir until the mixture is evenly combined and resembles wet sand.
-
Press the Crust: Transfer the biscuit mixture to a 9-inch (23 cm) springform pan or pie dish. Press the crumbs down with the back of a spoon to create an even layer at the bottom. Be sure to press it firmly so it holds together when the cheesecake is set.
-
Chill the Crust: Place the crust in the fridge to chill while you prepare the cheesecake filling. This will allow the crust to firm up and set.
Step 2: Prepare the Cheesecake Filling
-
Bloom the Gelatin: In a small bowl, sprinkle the gelatin powder over 2 tablespoons of cold water. Let it sit for about 5 minutes to bloom. The gelatin will absorb the water and swell up, preparing it for the next step.
-
Dissolve the Gelatin: After the gelatin has bloomed, gently heat it in the microwave for 10-15 seconds or on the stovetop until it becomes liquid. Stir to ensure there are no lumps. Let it cool slightly.
-
Whip the Cream: In a separate large bowl, whip the heavy cream with a hand mixer or stand mixer until stiff peaks form. Set aside.
-
Mix the Cream Cheese: In another bowl, beat the softened cream cheese with a hand mixer until smooth and creamy. Add the powdered sugar, vanilla extract, lemon juice, and lemon zest. Continue to beat until well combined.
-
Combine the Gelatin and Cream Cheese: Slowly add the dissolved gelatin into the cream cheese mixture, mixing until incorporated. Make sure the gelatin isn’t too hot when you add it, as it could cause the mixture to curdle.
-
Fold in the Whipped Cream: Gently fold the whipped cream into the cream cheese mixture. Use a spatula to mix, being careful not to deflate the whipped cream. This will keep the filling light and airy.
Step 3: Assemble the Cheesecake
-
Fill the Pan: Pour the cream cheese filling over the chilled crust, smoothing it out with a spatula. Make sure the filling is evenly distributed and there are no air bubbles.
-
Chill the Cheesecake: Cover the cheesecake with plastic wrap or foil and refrigerate for at least 3-4 hours, or preferably overnight. This will allow the cheesecake to set properly.
Step 4: Prepare the Lemon Jelly Topping
-
Prepare the Jelly: In a small saucepan, heat the water and sugar (if using) over low heat until the sugar dissolves. Once the sugar has dissolved, stir in the lemon-flavored gelatin. Bring the mixture to a boil, then remove it from the heat and let it cool to room temperature.
-
Top the Cheesecake: Once the cheesecake filling has set, carefully pour the cooled lemon jelly over the top. Ensure that the jelly layer is evenly spread across the surface.
-
Chill Again: Return the cheesecake to the refrigerator and chill for another 1-2 hours, or until the jelly has fully set and the cheesecake is firm.
Step 5: Garnish and Serve
-
Garnish the Cheesecake: Once the cheesecake has set, remove it from the fridge and carefully run a knife around the edge of the springform pan to release the sides. Top the cheesecake with fresh mint leaves, lemon slices, or a dollop of whipped cream for an extra touch of elegance.
-
Slice and Enjoy: Cut the cheesecake into slices and serve chilled. The cheesecake should have a creamy filling with a smooth, glossy jelly topping.
- Prep Time: 20 minutes
- Cook Time: 3-4 hours (or overnight)
Nutrition
- Serving Size: 8-10
- Calories: 250-300
- Fat: 15g
- Carbohydrates: 30g
- Protein: 4g
Conclusion
This No-Bake Lemon Jelly Cheesecake is the perfect combination of creamy, tangy, and sweet, and it’s sure to impress your guests. The light and refreshing lemon flavor, combined with the smooth texture of the cheesecake filling and the glossy jelly topping, creates a dessert that’s both elegant and easy to make. Whether you’re preparing it for a special occasion or simply to satisfy your sweet tooth, this cheesecake will be a hit every time.