
Introduction
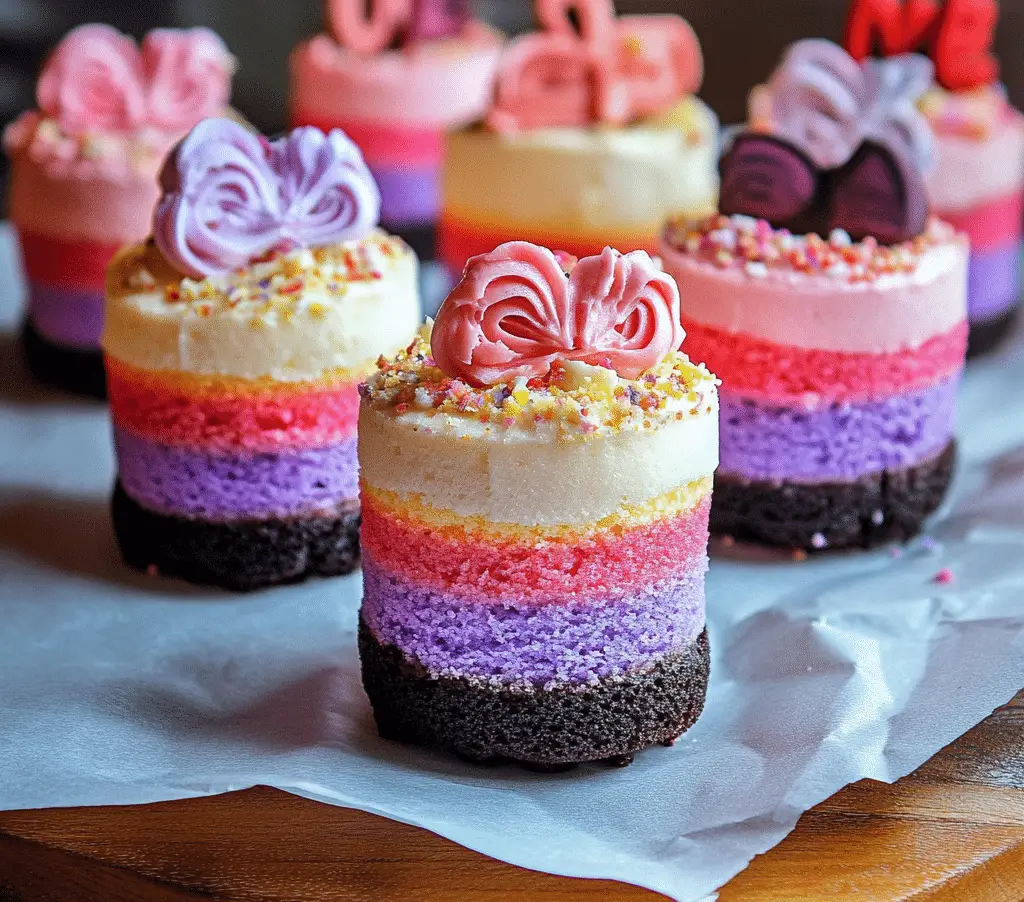
Mini Ombre Cakes are a fun and visually stunning dessert that will make any celebration extra special. These adorable, individual-sized cakes feature a beautiful gradient effect, transitioning from one color to another, typically in soft pastel tones, but they can be customized to suit any theme or color palette. With their soft layers of cake, smooth buttercream, and eye-catching ombre effect, they are a treat for both the eyes and the taste buds.
Whether you’re planning a birthday party, baby shower, or a wedding, Mini Ombre Cakes are a delightful addition to your dessert table. Their compact size makes them perfect for individual servings, and their vibrant colors make them a fun focal point for any gathering. This recipe takes you step-by-step through the process of creating these stunning cakes with minimal effort, making them an accessible treat for bakers of all skill levels.
Perfect for anyone who enjoys making their desserts visually striking and delicious, Mini Ombre Cakes are sure to impress and delight your guests.
Perfect for:
- Birthday parties and celebrations
- Wedding or bridal showers
- Special occasions like graduations or anniversaries
- Afternoon tea or coffee
- Dessert tables or catering events
Why You’ll Love This Recipe
Here’s why Mini Ombre Cakes will quickly become one of your favorite go-to recipes:
- Visually Striking: The ombre effect creates a beautiful gradient of colors that looks stunning on any dessert table. They’re an easy way to elevate the look of your cakes.
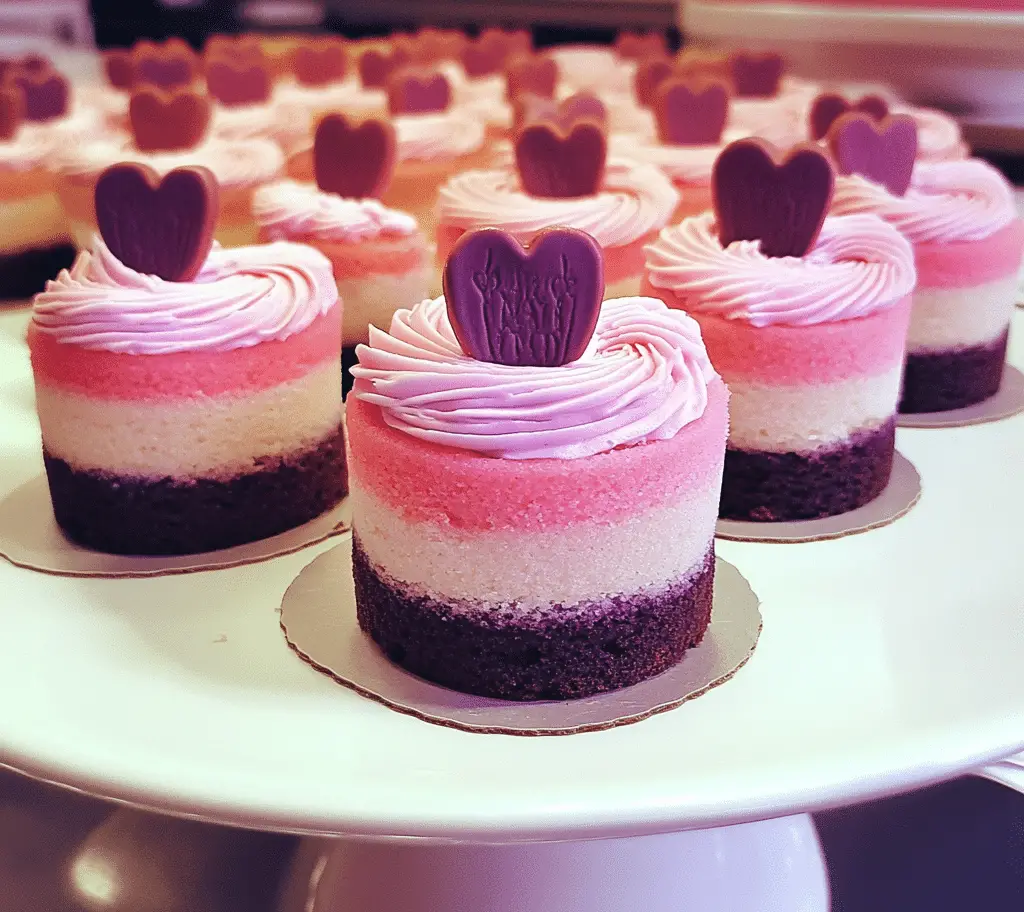
- Individual Servings: These mini cakes are the perfect size for individual servings, making them ideal for parties and gatherings where guests can enjoy their own personal cake.
- Customization: You can personalize the color scheme to match any theme or occasion. From pastels for a baby shower to bold, vibrant colors for a birthday, these cakes can fit any event.
- Delicious Layers: The soft, fluffy cake layers paired with smooth, creamy buttercream make every bite of these mini cakes irresistible.
- Easy to Make: Despite their intricate look, Mini Ombre Cakes are surprisingly easy to make with just a few basic ingredients. With a little patience and attention to detail, you can create a gorgeous dessert.
Preparation and Cooking Time
- Total Time: 2 hours (including cooling and decorating time)
- Preparation Time: 30 minutes
- Baking Time: 20-25 minutes (depending on cake size)
- Chilling Time: 30 minutes
- Servings: 6-8 mini cakes
- Calories per serving: Approximately 350-400 calories
- Key Nutrients: Protein: 3g, Carbs: 50g, Fat: 18g
Ingredients
Here’s what you’ll need to make these delightful Mini Ombre Cakes:
- For the Cake Layers:
- 2 cups all-purpose flour
- 1 ½ teaspoons baking powder
- ½ teaspoon salt
- 1 cup unsalted butter, softened
- 1 ½ cups granulated sugar
- 4 large eggs
- 1 teaspoon vanilla extract
- ½ cup whole milk
- Food coloring (in your choice of colors)
- For the Buttercream Frosting:
- 2 cups unsalted butter, softened
- 4 cups powdered sugar
- 2 teaspoons vanilla extract
- 2-3 tablespoons heavy cream (adjust for consistency)
- Food coloring (to match your cake layers)
Ingredient Highlights
- Cake Flour: All-purpose flour creates a tender, fluffy crumb in the cake layers. If you prefer a finer texture, cake flour can be used.
- Butter: The unsalted butter helps to create a soft, moist texture in both the cake and the frosting.
- Sugar: Granulated sugar provides sweetness and stability to the cake and buttercream, allowing both to hold their shape.
- Food Coloring: You can use gel or liquid food coloring to achieve the ombre effect in both the cake and buttercream. Gel coloring tends to provide brighter, more vivid colors without changing the consistency.
- Heavy Cream: This adds the right amount of moisture to the buttercream, helping it to reach a smooth, spreadable consistency.
Step-by-Step Instructions
Follow these steps to create your beautiful and delicious Mini Ombre Cakes:
Prepare the Cake Layers:
- Preheat the Oven: Preheat your oven to 350°F (175°C). Grease and flour your mini cake pans (6-inch round pans work great) or line them with parchment paper.
- Mix the Dry Ingredients: In a medium bowl, whisk together the flour, baking powder, and salt to combine. Set aside.
- Cream the Butter and Sugar: In a large mixing bowl, cream the softened butter and granulated sugar together using an electric mixer on medium speed. Beat until light and fluffy, about 3-4 minutes.
- Add the Eggs and Vanilla: Add the eggs, one at a time, beating well after each addition. Stir in the vanilla extract.
- Alternate Adding Dry Ingredients and Milk: Gradually add the dry ingredients to the butter mixture, alternating with the milk. Begin and end with the dry ingredients. Mix until just combined. Be careful not to overmix the batter.
- Divide and Color the Batter: Divide the batter evenly into separate bowls, depending on how many colors you want for your ombre effect. Add a few drops of food coloring to each bowl and mix until the desired color is achieved. Start with the lightest color and progress to darker shades.
- Bake the Cake Layers: Pour each colored batter into the prepared mini cake pans, spreading it out evenly. Bake for 20-25 minutes, or until a toothpick inserted into the center of the cakes comes out clean. Allow the cakes to cool in the pans for 10 minutes before transferring them to a wire rack to cool completely.
Prepare the Buttercream Frosting:
- Make the Buttercream: While the cakes are cooling, make the buttercream frosting. In a large mixing bowl, beat the softened butter with an electric mixer until smooth and creamy. Gradually add the powdered sugar, 1 cup at a time, beating on low speed to prevent a sugar cloud. Add the vanilla extract and 2 tablespoons of heavy cream. Beat until light and fluffy, adding more heavy cream if necessary to achieve a smooth, spreadable consistency.
- Divide and Color the Frosting: Once the frosting is ready, divide it into separate bowls to match the number of colors you used for the cake layers. Add a few drops of food coloring to each bowl and mix until the frosting reaches your desired shades.
Assemble the Mini Ombre Cakes:
- Trim the Cake Layers: Once the cakes are completely cool, trim the tops of each layer to level them. This will help ensure that your mini cakes are stable when stacked.
- Start Stacking the Layers: Begin stacking your cake layers, starting with the darkest color on the bottom and working your way to the lightest color on top. Apply a thin layer of frosting between each cake layer to help them stick together.
- Apply a Crumb Coat: Once the layers are stacked, apply a thin layer of frosting around the entire cake to seal in any crumbs. This is called a crumb coat. Place the cake in the fridge for 15-20 minutes to set the crumb coat.
- Frost the Cake: After the crumb coat has set, begin applying the rest of the frosting. Starting with the darkest color, spread the frosting around the bottom of the cake, blending slightly into the next color. Gradually work your way up, lightening the frosting as you go. Smooth out the edges with an offset spatula to create a seamless ombre effect.
- Add Final Touches: Once the cake is frosted, you can add additional decorations, such as sprinkles, edible flowers, or a dusting of edible glitter for an extra special touch.
Chill and Serve:
- Chill the Cakes: Place the mini cakes in the fridge for 15-20 minutes to firm up the frosting and make them easier to cut and serve.
- Serve and Enjoy: Once chilled, slice and serve your beautiful Mini Ombre Cakes. Enjoy the combination of the soft, fluffy cake with the smooth, colorful buttercream!
How to Serve Mini Ombre Cakes
Mini Ombre Cakes are the perfect treat for any special occasion, and they can be served in various ways:
- As Individual Desserts: These mini cakes are ideal for serving at parties, where guests can enjoy their own personalized cake. Serve them on small dessert plates with a fork for a charming touch.
- On a Dessert Table: These cakes make a stunning addition to a dessert table, especially when displayed alongside other sweet treats like macarons, cookies, and cupcakes. Their colorful appearance is sure to catch the eye.
- As Party Favors: Mini Ombre Cakes can be packaged in small boxes or clear plastic containers and given as party favors for guests to enjoy later.
- With Coffee or Tea: Serve Mini Ombre Cakes with a hot beverage like coffee, tea, or hot chocolate for an afternoon treat or dessert.
- For Special Occasions: Whether it’s a wedding, baby shower, or birthday party, Mini Ombre Cakes are a crowd-pleasing choice that adds a touch of elegance to any event.
Additional Tips for Mini Ombre Cakes
Here are some helpful tips to ensure your Mini Ombre Cakes turn out perfect every time:
- Use Gel Food Coloring: Gel food coloring provides more vibrant and consistent colors without watering down the batter or frosting.
- Chill the Cake Layers: After baking the layers, allow them to cool completely before trimming or frosting. This prevents the cake from becoming too crumbly or falling apart.
- Don’t Overmix the Batter: When adding the food coloring, mix gently to avoid deflating the batter. Overmixing can lead to dense cake layers.
- Use Room Temperature Ingredients: Ensure that the butter, eggs, and milk are at room temperature for smoother batter and frosting.
- Level the Cake Layers: Trimming the tops of your cakes ensures that they stack neatly and look professional.
Recipe Variations of Mini Ombre Cakes
Here are 10 variations of Mini Ombre Cakes you can try:
- Chocolate Ombre Cake: Use cocoa powder in your cake layers and frosting for a chocolate version of the ombre cake.
- Lemon Ombre Cake: Add lemon zest and juice to the cake for a tangy citrus flavor that pairs beautifully with soft yellow ombre colors.
- Red Velvet Ombre Cake: Use red velvet cake layers and cream cheese frosting for a rich, indulgent ombre cake.
- Carrot Cake Ombre Cake: Add grated carrots and spices to the batter for a warm, spiced ombre cake.
- Funfetti Ombre Cake: Add rainbow sprinkles to your cake batter for a fun and colorful twist on the traditional ombre cake.
- Matcha Ombre Cake: Infuse your cake layers with matcha powder for a green tea-flavored ombre cake.
- Strawberry Ombre Cake: Use strawberry puree or freeze-dried strawberry powder for a fruity twist on the ombre cake.
- Mint Chocolate Ombre Cake: Add mint extract to your frosting and use chocolate cake layers for a mint chocolate combination.
- Coconut Ombre Cake: Incorporate shredded coconut into the cake layers for a tropical flavor and texture.
- Peach Ombre Cake: Add fresh peach puree to the cake layers and frosting for a soft and juicy flavor.
Freezing and Storage for Mini Ombre Cakes
- Freezing: If you need to make Mini Ombre Cakes in advance, freeze the unassembled cake layers and buttercream frosting separately. Wrap the cake layers tightly in plastic wrap and place them in an airtight container or freezer bag. The frosting can be stored in a separate container in the fridge for up to 3 days. To serve, thaw the layers and frosting before assembling.
- Storage: Store the completed Mini Ombre Cakes in an airtight container in the fridge for up to 3 days. If the cakes are decorated with delicate decorations, it’s best to eat them within a day or two.
Special Equipment for Mini Ombre Cakes
Here are a few items that can make your Mini Ombre Cakes even easier to create:
- Mini Cake Pans: Small, round cake pans (6-inch or smaller) are perfect for making mini cakes.
- Electric Mixer: An electric mixer helps with beating the butter and sugar until light and fluffy, and also makes it easier to whip up the frosting.
- Offset Spatula: An offset spatula makes frosting the cakes easier and more precise, helping to create smooth layers of buttercream.
- Food Coloring: Gel food coloring provides rich and vibrant colors for your ombre effect.
- Cake Decorating Tools: Piping bags, tips, and decorating combs can be used for additional frosting techniques and decorations.
FAQ Section about Mini Ombre Cakes
- Can I make the mini cakes ahead of time? Yes, you can bake the cake layers and store them wrapped in plastic wrap for up to 2 days before assembling and frosting. The buttercream can also be made ahead and stored in the fridge.
- Can I make these cakes without food coloring? Yes, you can make these cakes without food coloring if you prefer a more subtle look. You could also use natural ingredients like beet juice or matcha powder to add color.
- Can I use store-bought frosting? Yes, store-bought frosting can be used, but homemade buttercream adds a richer flavor and smoother texture that enhances the mini cakes.
- How do I prevent the cake from cracking when stacking? To prevent cracking, ensure that the cake layers are completely cool before frosting and stacking. Applying a crumb coat also helps to seal in crumbs and prevent cracks.
- Can I use a different flavor of frosting? Absolutely! Feel free to experiment with different frosting flavors like cream cheese frosting, chocolate ganache, or whipped cream to suit your preferences.
Mini Ombre Cakes
- Total Time: 2 hours (including cooling and decorating time)
Ingredients
Here’s what you’ll need to make these delightful Mini Ombre Cakes:
- For the Cake Layers:
- 2 cups all-purpose flour
- 1 ½ teaspoons baking powder
- ½ teaspoon salt
- 1 cup unsalted butter, softened
- 1 ½ cups granulated sugar
- 4 large eggs
- 1 teaspoon vanilla extract
- ½ cup whole milk
- Food coloring (in your choice of colors)
- For the Buttercream Frosting:
- 2 cups unsalted butter, softened
- 4 cups powdered sugar
- 2 teaspoons vanilla extract
- 2–3 tablespoons heavy cream (adjust for consistency)
- Food coloring (to match your cake layers)
Ingredient Highlights
- Cake Flour: All-purpose flour creates a tender, fluffy crumb in the cake layers. If you prefer a finer texture, cake flour can be used.
- Butter: The unsalted butter helps to create a soft, moist texture in both the cake and the frosting.
- Sugar: Granulated sugar provides sweetness and stability to the cake and buttercream, allowing both to hold their shape.
- Food Coloring: You can use gel or liquid food coloring to achieve the ombre effect in both the cake and buttercream. Gel coloring tends to provide brighter, more vivid colors without changing the consistency.
- Heavy Cream: This adds the right amount of moisture to the buttercream, helping it to reach a smooth, spreadable consistency.
Instructions
Prepare the Cake Layers:
- Preheat the Oven: Preheat your oven to 350°F (175°C). Grease and flour your mini cake pans (6-inch round pans work great) or line them with parchment paper.
- Mix the Dry Ingredients: In a medium bowl, whisk together the flour, baking powder, and salt to combine. Set aside.
- Cream the Butter and Sugar: In a large mixing bowl, cream the softened butter and granulated sugar together using an electric mixer on medium speed. Beat until light and fluffy, about 3-4 minutes.
- Add the Eggs and Vanilla: Add the eggs, one at a time, beating well after each addition. Stir in the vanilla extract.
- Alternate Adding Dry Ingredients and Milk: Gradually add the dry ingredients to the butter mixture, alternating with the milk. Begin and end with the dry ingredients. Mix until just combined. Be careful not to overmix the batter.
- Divide and Color the Batter: Divide the batter evenly into separate bowls, depending on how many colors you want for your ombre effect. Add a few drops of food coloring to each bowl and mix until the desired color is achieved. Start with the lightest color and progress to darker shades.
- Bake the Cake Layers: Pour each colored batter into the prepared mini cake pans, spreading it out evenly. Bake for 20-25 minutes, or until a toothpick inserted into the center of the cakes comes out clean. Allow the cakes to cool in the pans for 10 minutes before transferring them to a wire rack to cool completely.
Prepare the Buttercream Frosting:
- Make the Buttercream: While the cakes are cooling, make the buttercream frosting. In a large mixing bowl, beat the softened butter with an electric mixer until smooth and creamy. Gradually add the powdered sugar, 1 cup at a time, beating on low speed to prevent a sugar cloud. Add the vanilla extract and 2 tablespoons of heavy cream. Beat until light and fluffy, adding more heavy cream if necessary to achieve a smooth, spreadable consistency.
- Divide and Color the Frosting: Once the frosting is ready, divide it into separate bowls to match the number of colors you used for the cake layers. Add a few drops of food coloring to each bowl and mix until the frosting reaches your desired shades.
Assemble the Mini Ombre Cakes:
- Trim the Cake Layers: Once the cakes are completely cool, trim the tops of each layer to level them. This will help ensure that your mini cakes are stable when stacked.
- Start Stacking the Layers: Begin stacking your cake layers, starting with the darkest color on the bottom and working your way to the lightest color on top. Apply a thin layer of frosting between each cake layer to help them stick together.
- Apply a Crumb Coat: Once the layers are stacked, apply a thin layer of frosting around the entire cake to seal in any crumbs. This is called a crumb coat. Place the cake in the fridge for 15-20 minutes to set the crumb coat.
- Frost the Cake: After the crumb coat has set, begin applying the rest of the frosting. Starting with the darkest color, spread the frosting around the bottom of the cake, blending slightly into the next color. Gradually work your way up, lightening the frosting as you go. Smooth out the edges with an offset spatula to create a seamless ombre effect.
- Add Final Touches: Once the cake is frosted, you can add additional decorations, such as sprinkles, edible flowers, or a dusting of edible glitter for an extra special touch.
Chill and Serve:
- Chill the Cakes: Place the mini cakes in the fridge for 15-20 minutes to firm up the frosting and make them easier to cut and serve.
- Serve and Enjoy: Once chilled, slice and serve your beautiful Mini Ombre Cakes. Enjoy the combination of the soft, fluffy cake with the smooth, colorful buttercream!
- Prep Time: 30 minutes
- Chilling: 30 minutes
- Cook Time: 20-25 minutes
Nutrition
- Serving Size: 6-8
- Calories: 350-400
- Fat: 18g
- Carbohydrates: 50g
- Protein: 3g
Conclusion
Mini Ombre Cakes are the perfect dessert for anyone who loves a visually stunning and delicious treat. With their soft, fluffy layers of cake and smooth, colorful buttercream frosting, these mini cakes bring joy and elegance to any occasion. Whether you’re celebrating a special event or simply want to enjoy a delightful dessert at home, Mini Ombre Cakes are a fantastic choice. Easy to make, customizable, and utterly delicious, they’ll quickly become a favorite in your baking repertoire. Enjoy every moment of making and eating these beautiful mini cakes!