

Introduction
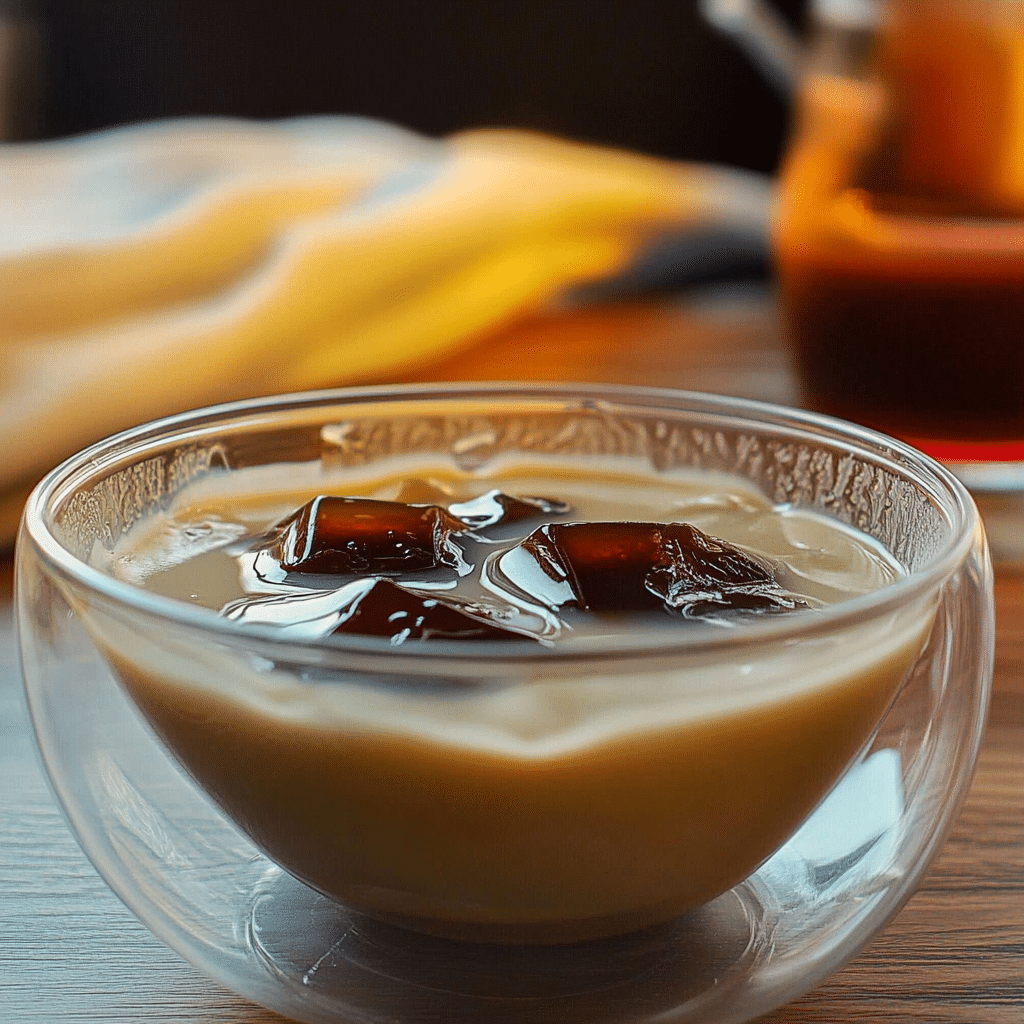
Coffee Jelly is a unique and refreshing dessert that combines the rich, bold flavor of coffee with a soft, wobbly texture. This dessert, popular in Japan, is made by dissolving coffee in gelatin or agar-agar and letting it set in the refrigerator. The result is a cool, firm jelly that’s perfect for coffee lovers who want to enjoy their favorite drink in a new form. It’s a light, fun treat that’s not only easy to prepare but also highly customizable with different toppings. Whether you’re looking for a dessert to beat the summer heat or simply a unique way to enjoy coffee, Coffee Jelly is sure to impress.
Coffee Jelly is perfect for anyone who loves coffee and is looking for a dessert that’s both satisfying and refreshing. It’s a great addition to brunches, afternoon tea, or even a light dessert after a heavy meal. With minimal ingredients and prep time, it’s an easy-to-make treat that offers a fun twist on the usual coffee experience.
Perfect for:
- Coffee enthusiasts
- Hot summer days
- After-dinner treats
- Brunch or tea time
- Easy-to-make desserts
Why You’ll Enjoy This Coffee Jelly Recipe
Coffee Jelly is an exciting dessert for a variety of reasons:
- Great Coffee Flavor: If you love coffee, this dessert provides the perfect way to enjoy your favorite beverage in a fun and new way.
- Light and Refreshing: The jelly has a cool, refreshing texture, making it ideal for hot days or when you want something light after a meal.
- Quick and Easy: With minimal prep time, you can prepare Coffee Jelly quickly and let it set in the fridge while you focus on other things.
- Versatile: You can customize Coffee Jelly with different toppings like whipped cream, ice cream, or condensed milk, making it as simple or as indulgent as you like.
- Unique Texture: The gelatin gives the jelly a firm yet wobbly texture that is fun to eat and gives the dessert a unique appeal.
Preparation and Cooking Time
- Total Time: 4 hours 10 minutes (includes chilling)
- Preparation Time: 10 minutes
- Cooking Time: 5 minutes
- Chilling Time: 4 hours
- Servings: 6-8 servings
- Calories per serving: Around 120-150 calories
- KEY INGREDIENTS: Fat 0g, Carbs 25g, Protein 1g
Ingredients for Coffee Jelly
Here are the ingredients you’ll need to prepare this delicious treat:
- 2 cups brewed coffee (strong)
- 2 tablespoons sugar (adjust to taste)
- 1 tablespoon agar-agar powder (or 2 teaspoons gelatin powder)
- 1 cup cold water
- ½ teaspoon vanilla extract (optional)
- Toppings: Whipped cream, vanilla ice cream, sweetened condensed milk, chocolate syrup (optional)
Ingredient Highlights
- Coffee: Strong coffee is the key to this dessert. A robust, flavorful brew will ensure the jelly has a rich coffee taste.
- Agar-Agar or Gelatin: Agar-agar is a plant-based gelling agent that creates a firmer texture, making it a great choice for vegans. Gelatin also works but is animal-derived.
- Sugar: Sweeten the coffee to your liking with sugar or an alternative sweetener.
- Vanilla Extract: Adding vanilla enhances the coffee flavor, but it’s not necessary.
Step-by-Step Instructions for Coffee Jelly
Follow these easy steps to prepare your Coffee Jelly:
Prepare the Coffee Jelly Mixture
- Brew the Coffee: Brew 2 cups of strong coffee. If you’re using instant coffee, dissolve the granules in hot water according to package instructions. Strong coffee is essential to give the jelly its deep flavor.
- Dissolve the Gelatin or Agar-Agar: In a small saucepan, combine 1 cup of cold water with agar-agar or gelatin. Heat over medium, stirring constantly until fully dissolved. If using agar-agar, simmer for 2-3 minutes. For gelatin, simply heat until dissolved, without boiling.
- Sweeten the Coffee: Add the brewed coffee to the gelatin or agar-agar mixture. Stir in the sugar until it’s dissolved, adjusting sweetness to taste. You can skip sugar or use a sugar substitute if preferred.
- Add Vanilla (Optional): Stir in the vanilla extract for added flavor depth. This step is optional, but it complements the coffee flavor nicely.
Set the Jelly
- Pour into Molds: Once the coffee mixture is ready, pour it into a shallow dish, mold, or individual cups. A shallow dish helps the jelly set more evenly, but you can also use individual serving cups for an elegant presentation.
- Cool and Refrigerate: Let the mixture cool to room temperature before placing it in the refrigerator. Allow it to set for at least 4 hours, or until firm.
Serve the Coffee Jelly
- Cut into Pieces: Once the jelly is set, cut it into small cubes or rectangles. The size of the pieces depends on your preference; smaller cubes are easier to eat, but larger ones create more texture.
- Add Toppings: Serve the jelly in bowls or cups. Top it with whipped cream, vanilla ice cream, sweetened condensed milk, or even a drizzle of chocolate syrup for a rich finish.
How to Serve Coffee Jelly
Coffee Jelly can be served in many different ways:
- With Whipped Cream: A dollop of whipped cream complements the firm jelly, adding a creamy texture that balances the coffee flavor.
- With Ice Cream: For a more indulgent treat, top the jelly with a scoop of vanilla ice cream. The cold creaminess of the ice cream pairs perfectly with the coffee’s richness.
- With Condensed Milk: Add a drizzle of condensed milk for a sweet, creamy contrast to the coffee’s slightly bitter taste.
- Layered in Glasses: Layer coffee jelly cubes with whipped cream or ice cream in a tall glass for a visually striking dessert.
- Individual Cups: Serve in individual cups for a more sophisticated presentation, ideal for parties or gatherings.
Additional Tips for Making Coffee Jelly
Here are a few tips to help you make perfect Coffee Jelly:
- Use Strong Coffee: Make sure your coffee is brewed strong enough to give the jelly a rich flavor. A dark roast or extra coffee grounds will give the jelly a bolder taste.
- Chill Long Enough: Ensure the jelly is fully set by letting it chill in the fridge for at least 4 hours. If it’s not set enough, it may break apart when you cut it.
- Don’t Overheat the Coffee: Be careful not to boil the coffee after adding it to the gelatin mixture, as too much heat can affect the gelling process.
- Adjust Sweetness: Feel free to adjust the sweetness of the jelly to suit your taste, using more or less sugar, or even a sugar substitute.
Recipe Variations for Coffee Jelly
Here are some fun variations to try with Coffee Jelly:
- Mocha Coffee Jelly: Add cocoa powder or instant chocolate powder to the coffee mixture for a chocolatey twist on the classic recipe.
- Espresso Coffee Jelly: Use a shot of espresso for an even more intense coffee flavor.
- Coconut Coffee Jelly: Replace some of the water with coconut milk for a tropical variation.
- Chocolate Drizzle: Top the jelly with a drizzle of melted chocolate or chocolate syrup for a rich, sweet finish.
- Coffee Jelly Float: Add a scoop of ice cream to your jelly and top with a little soda water for a refreshing float.
- Hazelnut Coffee Jelly: Add a splash of hazelnut syrup or extract to the coffee mixture for a nutty flavor.
- Fruit-Topped Coffee Jelly: Add fresh fruit like berries or citrus slices as a topping for a burst of freshness.
- Coffee Cream Jelly: Top the jelly with a creamy coffee-flavored whipped cream for a richer dessert.
- Coffee Jelly with Caramel: Drizzle caramel sauce over the jelly for an added layer of sweetness.
- Cinnamon Coffee Jelly: Stir in a bit of cinnamon or other spices for a warm, spiced variation.
Freezing and Storage for Coffee Jelly
- Freezing: You can freeze Coffee Jelly for up to 1-2 months. Cut it into cubes and store it in an airtight container. Thaw in the fridge before serving.
- Storage: Store the jelly in the refrigerator for up to 4 days. If it starts to lose its firm texture, just chill it again to restore its shape.
Special Equipment for Coffee Jelly
You’ll need a few basic kitchen tools to make Coffee Jelly:
- Small Saucepan: To dissolve the gelatin or agar-agar.
- Shallow Dish or Molds: For setting the jelly mixture.
- Whisk or Spoon: To stir the coffee and gelatin together.
- Sharp Knife: To cut the jelly into neat cubes or shapes.
- Serving Glasses or Bowls: For serving the jelly in a stylish way.
FAQ Section for Coffee Jelly
- Can I use sugar substitutes?
Yes, feel free to use sugar alternatives like stevia, honey, or maple syrup if you prefer a sugar-free version. - Can I use instant coffee instead of brewed coffee?
Absolutely! Instant coffee is an excellent alternative, and it’s easy to dissolve in water for a quick brew. - How can I make this dessert dairy-free?
Use coconut cream or non-dairy whipped topping instead of regular cream or ice cream to keep it dairy-free. - Is this dessert vegan?
If you use agar-agar instead of gelatin, this dessert can be made vegan. Make sure the toppings are also vegan if needed. - How do I store leftover jelly?
Keep any leftover jelly in the fridge for up to 4 days. Simply cover it with plastic wrap or store it in an airtight container.
Coffee Jelly
- Total Time: 4 hours 10 minutes (includes chilling)
Ingredients
Coffee Jelly is an exciting dessert for a variety of reasons:
- Great Coffee Flavor: If you love coffee, this dessert provides the perfect way to enjoy your favorite beverage in a fun and new way.
- Light and Refreshing: The jelly has a cool, refreshing texture, making it ideal for hot days or when you want something light after a meal.
- Quick and Easy: With minimal prep time, you can prepare Coffee Jelly quickly and let it set in the fridge while you focus on other things.
- Versatile: You can customize Coffee Jelly with different toppings like whipped cream, ice cream, or condensed milk, making it as simple or as indulgent as you like.
- Unique Texture: The gelatin gives the jelly a firm yet wobbly texture that is fun to eat and gives the dessert a unique appeal.
Preparation and Cooking Time
- Total Time: 4 hours 10 minutes (includes chilling)
- Preparation Time: 10 minutes
- Cooking Time: 5 minutes
- Chilling Time: 4 hours
- Servings: 6-8 servings
- Calories per serving: Around 120-150 calories
Ingredients for Coffee Jelly
Here are the ingredients you’ll need to prepare this delicious treat:
- 2 cups brewed coffee (strong)
- 2 tablespoons sugar (adjust to taste)
- 1 tablespoon agar-agar powder (or 2 teaspoons gelatin powder)
- 1 cup cold water
- ½ teaspoon vanilla extract (optional)
- Toppings: Whipped cream, vanilla ice cream, sweetened condensed milk, chocolate syrup (optional)
Ingredient Highlights
- Coffee: Strong coffee is the key to this dessert. A robust, flavorful brew will ensure the jelly has a rich coffee taste.
- Agar-Agar or Gelatin: Agar-agar is a plant-based gelling agent that creates a firmer texture, making it a great choice for vegans. Gelatin also works but is animal-derived.
- Sugar: Sweeten the coffee to your liking with sugar or an alternative sweetener.
- Vanilla Extract: Adding vanilla enhances the coffee flavor, but it’s not necessary.
Instructions
Prepare the Coffee Jelly Mixture
- Brew the Coffee: Brew 2 cups of strong coffee. If you’re using instant coffee, dissolve the granules in hot water according to package instructions. Strong coffee is essential to give the jelly its deep flavor.
- Dissolve the Gelatin or Agar-Agar: In a small saucepan, combine 1 cup of cold water with agar-agar or gelatin. Heat over medium, stirring constantly until fully dissolved. If using agar-agar, simmer for 2-3 minutes. For gelatin, simply heat until dissolved, without boiling.
- Sweeten the Coffee: Add the brewed coffee to the gelatin or agar-agar mixture. Stir in the sugar until it’s dissolved, adjusting sweetness to taste. You can skip sugar or use a sugar substitute if preferred.
- Add Vanilla (Optional): Stir in the vanilla extract for added flavor depth. This step is optional, but it complements the coffee flavor nicely.
Set the Jelly
- Pour into Molds: Once the coffee mixture is ready, pour it into a shallow dish, mold, or individual cups. A shallow dish helps the jelly set more evenly, but you can also use individual serving cups for an elegant presentation.
- Cool and Refrigerate: Let the mixture cool to room temperature before placing it in the refrigerator. Allow it to set for at least 4 hours, or until firm.
Serve the Coffee Jelly
- Cut into Pieces: Once the jelly is set, cut it into small cubes or rectangles. The size of the pieces depends on your preference; smaller cubes are easier to eat, but larger ones create more texture.
- Add Toppings: Serve the jelly in bowls or cups. Top it with whipped cream, vanilla ice cream, sweetened condensed milk, or even a drizzle of chocolate syrup for a rich finish.
- Prep Time: 10 minutes
- Chilling: 4 hours
- Cook Time: 5 minutes
Nutrition
- Serving Size: 6-8
- Calories: 120-150
- Fat: 0g
- Carbohydrates: 25g
- Protein: 1g
Conclusion
Coffee Jelly is a refreshing, easy-to-make dessert that combines the deep flavor of coffee with a fun, gelatinous texture. Perfect for coffee lovers, this dessert is light enough for summer but also a great treat year-round. It’s simple to prepare and can be customized with your favorite toppings, making it a versatile addition to your dessert repertoire. Whether you enjoy it with a dollop of whipped cream, a scoop of ice cream, or a drizzle of caramel, Coffee Jelly is a treat that will quickly become a favorite.